Houdini Tips & Tricks
Satellite Terrain Data and QGIS for VFX
This video I walk through downloading and using satellite DTM data for landscapes.
I will also talk about using QGIS for getting a good diffuse texture to use for the terrain.


VEX: Interior Point Angles
This is useful is you want generate features on corners of objects.
This method will provide interior angles of the points.
Using "neighbour" vex function will provide points that are conencted to '@ptnum' (the current point). One thing to be aware of is that the points returned from the this function are not in a particular order. in my example point 5 will provide the connected points in reverse order to the rest of the points returned.
Following a key dot product theorum: a . b = |a| * |b| * cosθ
Where |a| is the length of the vector.
Rearranging the formula can provide θ which will be in radians.
VEX: Random Orientation
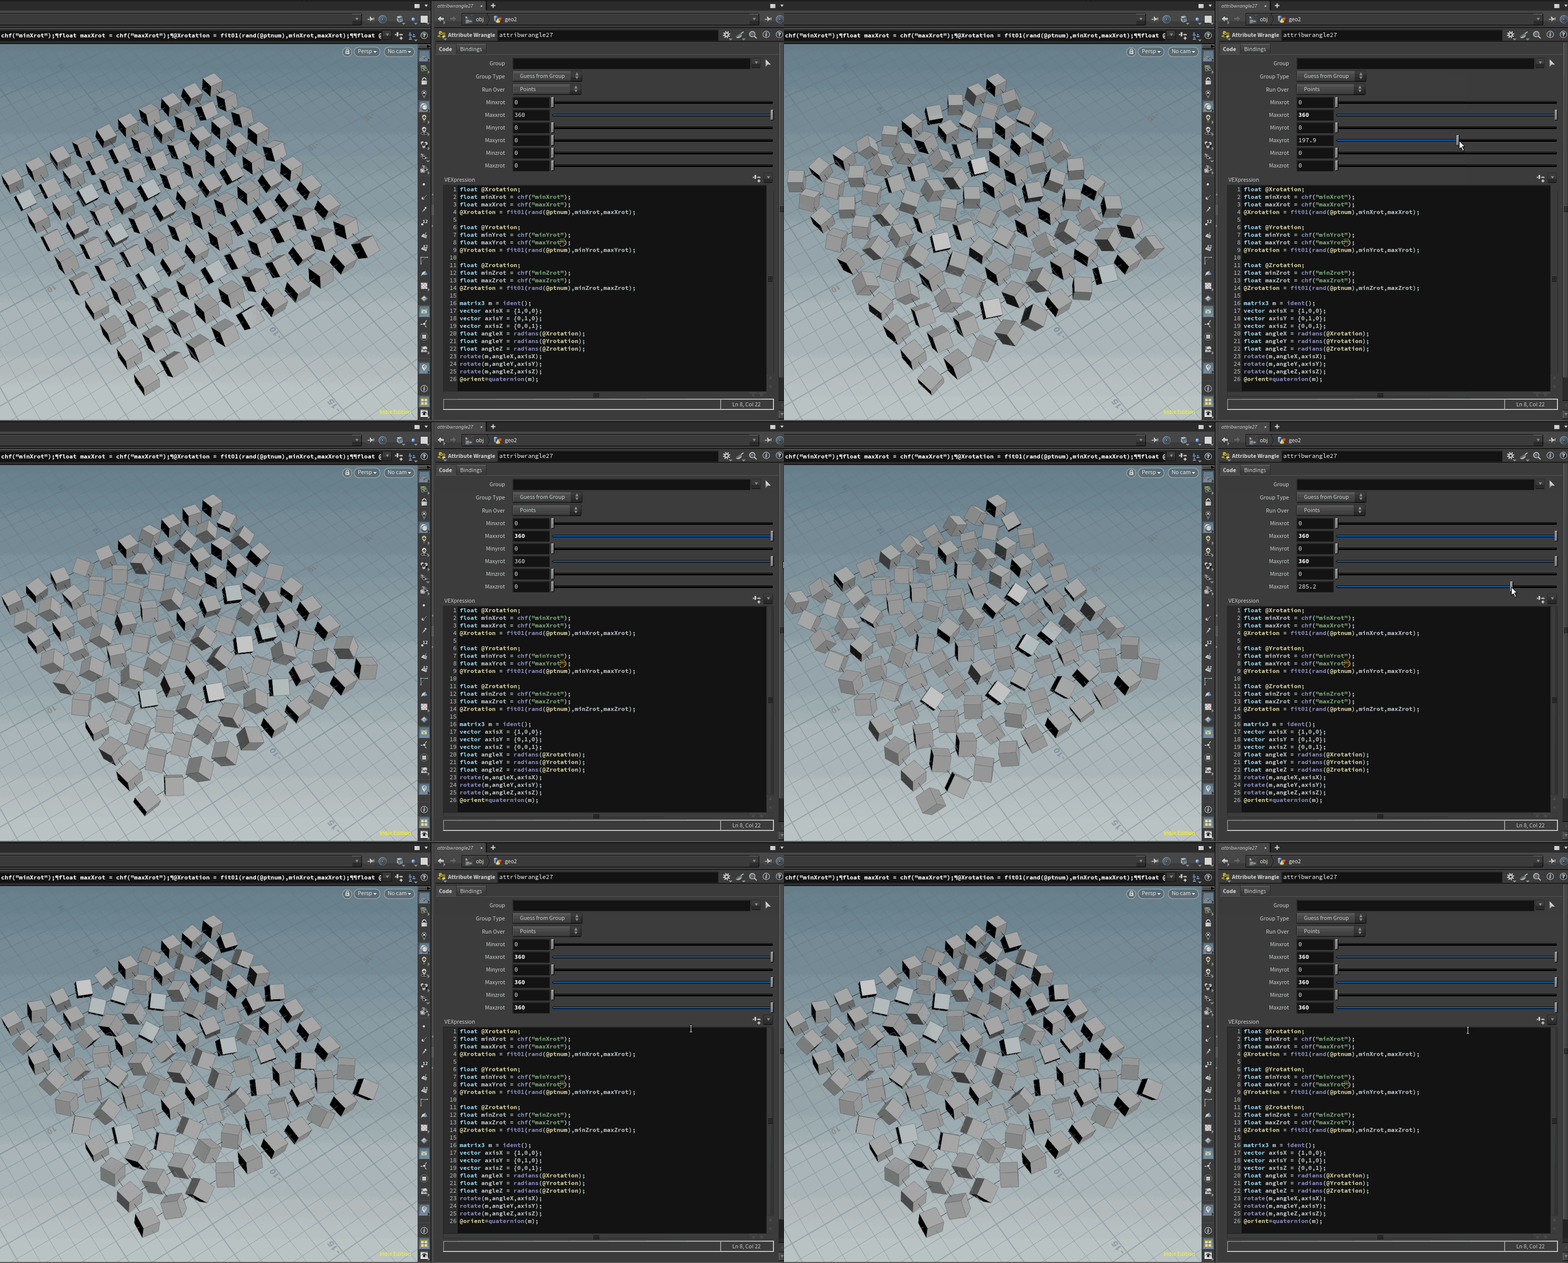
Wrangle to add to points before using 'copy to points'.
For each Axis we create a random rotation between two values that the user chooses. These are in degrees and will need to be converted to radians to perform that rotations.
The matrix of each point to scatter on is rotated around an axis by the random angle generated.


PYTHON: Version Tracking Using Custom Environment Variables
Using a "Null", populate the parameter interace with 3 string inputs (one set to multiline for the code to run from). The other two inputs are for the input for the version number and the variable its being written to.
There is a python call back script set on the button so that when clicked it runs the code in the multiline string input.
NOTE: The Variable need to be creted from Edit > Aliases and Variables > Variables initalially. After that the updates can be done from the null node.


VEX: Select Middle Points
To select the middle points of a curve that may fluctuate between an odd or even number of points.
Using the result of modulo the condition used to select the middle points will change.
For the even numbers there will be two middle numbers. Get the 'Mid Value' as a float and dividing it by 2. Then using the 'ceiling' and 'floor' methods on the float mid value will provide the points numbers that are the result of either being rounded up or down.


VEX: Create Group Of Top Points
-Add 'attribute Promote'
-Set Original name to 'P'
-New class to 'detail'
-Promotion Method to 'Maximum'
-Set new name 'MaxPoints'
-In the wrangle make sure its set to run over points. Then need to unpack the vector 'MaxPoints' from the detail class [line1].
-Extract a component of the vector as a float variable 'MaxYpoint'. [line2]
-If statement to run the condition over all the points. If the '@P.y' or the height of the object matches the 'maxYpoint' then do the action. [line3]
-The action, inside the curly brackets, then is the condition is true is to create a group and assign it an integer value of 1 for True.[Line4]

VEX: Iterative Naming From Loop
In this example I have a box copied to copied to points through a basic scatter.
To generate induvial naming for each box scattered i have created a For loop using the connectivity SOP. You could actually do this with just using the connectivity SOP and not for each loop by using the class number instead of the iteration detail from the meta node.
-Create a string variable called 'numberID'. For this we need to reference the 'iteration' attribute in the detail class from the meta node. this returns an integer which needs to be converted to a string. This is done with 'itoa()'.[line1]
-Doing a simple string concatenation using the 'numberID' variable we can generate the naming.

VEX: Group First And Last Points
For this example we'll sure a line that has a few points on it.
In the point wrangle we want to run a 'if' loop over the points to see if it matches the condition.
We can have multiple conditions to refine our selection linked with the standard logic operators.
In this example we want to find the point number (@ptnum) thats equal to 0 for the first point. To find the last point we can do total number of points on the geo (@numpt) and take away 1 because the point numbers start at 0 and not 1. We can then link the two conditions with the logic operator, OR '||'.
Finally, inside the curly brackets we create a group and set its value to 1 if if matches the conditions.

VEX: If In Group
To check if a item is in a certain group, in this case a primitive, we can use an 'if' statement in a prim wrangle.
-Inside the normal brackets, for the condition, we use a 'inprimgroup()' function which should return 1 if True.[line1]
-The first required field for the function is '0' for checking the first input on the prim wrangle.
-Second field is the group name to check for.
-Third input is the primitive to query. Here we use @primnum so that it uses the primitive number that its currently iterating over.
-To compare the value returned we use '=='
-Inside the curly brackets set the action you want to do if returned true.

UVs: Dynamic Texel Density
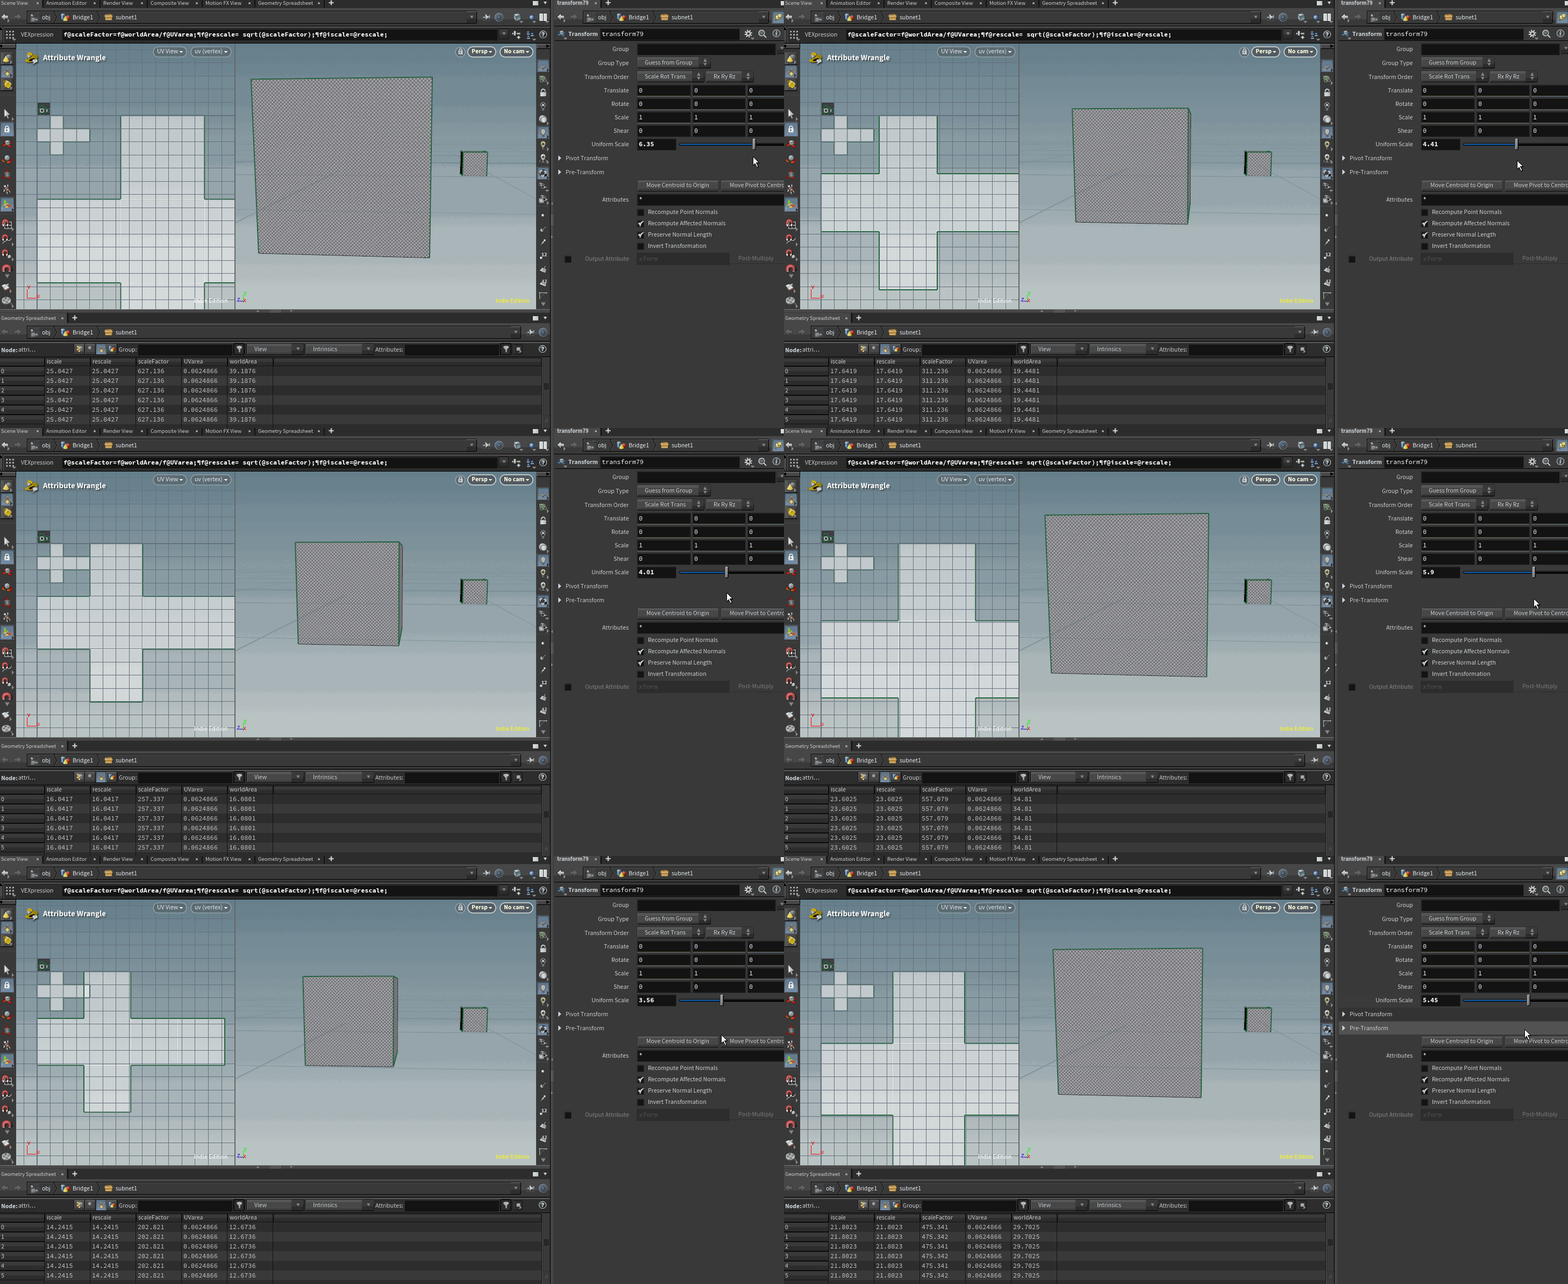
-After the geo has UV's add two measure nodes set to run over primitives.
-Set the position attribute to 'uv' and the output attribute name to 'UVarea'.
-Add second measure node and set it to 'P' and output attribute name to 'worldArea'.
-Add a primative wrangle and enter the following code:
-To find the ratio between the UV surface area and the world area divide them.[line1]
-The rescale factor is equal to the square root of the ratio. This is because we're scaling in both U and V directions so will scale quadratically.[line2]
-The default variable used in the UV layout node is iscale so we remap the value of rescale to this attribute. [line3]
-Next the UVlayout node turn on Variable scaling with attribute 'iscale'.
-If you want to dynamically adjust the texel density you can reference a parameter control in the 'Packing > Fixed scale' input.
Vellum: Dynamic Constraint Groups
As the point count / topology may change as you look dev the geo you're simulating it will help to save time by setting up a dynamic way to attach the seams.
-The points used to constrained and attached the loops to the flag using a group node with bounding box.
-It might be best to group multiple loops in different groupings.
-The point order of the target should match the point order of the source geo.
-Using a 'Sort' node, add all the groups in order you want the sort to occur. [refer to screen shot]
-Use 'Along Vector' and specify the direction.
Do the same for the target points.
In the 'Vellum Drape' node the groups to constrain to each other can be specified. [refer to screenshot]
SOLARIS: Scatter Colour Inheritance
Step A - Import terrain geo. It currently should have no colour attribute.
Step B - Use 'attribute from map' to add 'Cd' (colour) to the points of the terrain Geo.
Step C - Add a scatter onto the terrain. The scatter points should automatically inherit the colour values.
Step D - In copy to points choose 'Pack and Instance'. watch out that you don't double pack. Thats why I have unpack the imported alembics in the green box.
Step E - Use the 'SOPimport' node in LOPs/stage. Under the 'Primitive Definition' check the packed primitive and set it to "Create Point Instancer".
Step F - Check under the meta data for the instances that the colour attribute is coming on on the points (instances). It maybe be called "primvars:displayColor".
Step G - In the material builder create the "mtlxgeopropvalue" to get the properties. Here it should reference "displayColor" in the 'Geomprop' feild.
SOLARIS: Getting Set Up


VOP: Displace Geo
For this example the cylinder has a simple UV unwrap. Adding a 'Attribute from Map' node a Megascans displacement map is being referenced. The output attribute is 'DisplacementA'.
Adding a VOP node inside we want to import the attribute and multiply it with the normal. We then add this with the current point position value.
On the VOP node itself go to the 'Attriubte Bindings' and check on 'Update normals if displaced'.
PolyPath For Merging Curves
To merge curves the natural instinc might be to go for a "Fuse"node. This will appear to do the job as the Points will fuse but infact it will still cause issues. The vertices won't have fused and so the primitive count (in the example in the screenshots) will emain at 3 prims as seen in the geo spreedsheet. Using the poly path node and enabling the "connect points". the points and vertices will merge producing only one primive.
The issue may arrise when sweeping the curve.

Misc: Create Spare Input
On pretty much any node you can go to the 'cog' symbol in the top left of the parameters panel and create a spare input. I find this useful to access some detail or info that isn't part of the current geo tree/stream. In this example the translate Y value referencing the minimum point position of another piece of geo. To access data from the spare input we have to refer to it as -1.
detail(-1,"minPoints",1)
Misc: Random Colour Per Geo
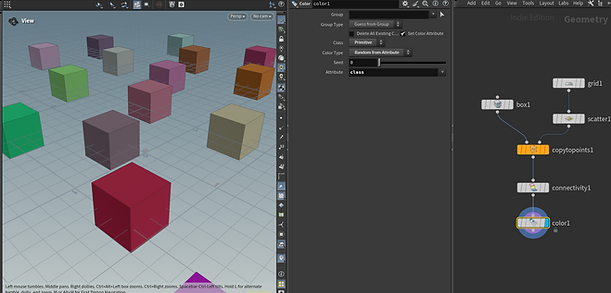
Using a connectivity Sop we can generate an attribute called 'class' on each prim. The number changes if the prim is not connected to the previous prim number.
Using a colour node. Set the 'Class' to 'Prim', colour type to 'random from attribute' and 'Attribute' to 'class'.

Misc: Blast From Attribute Value
To access an attribute in the blast node use the '@' and then an expression to clip the geo based on the value. Note depending on the class the attribute is stored, remember to change the class on the blast node. eg Primitive.
Misc: rop_fbxcharacteroutput To UE5
I came across this issue when exporting a cloth sim with bones to UE5.
I used the 'rop_fbxcharacteroutput' node. The asset needed to have two materials. One for the flags and another for the rope that they're attached to.
To get two material slots for the asset in Unreal you need to two different 'shop_materialpath' attribute on the primitives.
The next step is to add an 'attribute Swap' node.
Method: copy
Source: shop_materialpath
Destination: fbx_material_name
At export the 'rop_fbxcharacteroutput' will only use the 'fbx_material_name'. However when you re-import the fbx the attribute will be named as 'shop_materialpath'.


